Cleaning a hair brush is the process of removing accumulated hair, dead skin cells, product residue, dust, and oils from the bristles and base of the brush to restore its hygiene and performance. While it is one of the most basic maintenance tasks in hair care, it is frequently overlooked — and the consequences extend beyond aesthetics.
A brush that is not cleaned regularly redistributes old sebum, styling product residue, and environmental particles back onto the hair and scalp with every use. For salon professionals, this affects client outcomes. For brands developing hair brush product lines, including clear cleaning and maintenance guidance with their products directly influences customer satisfaction and review quality.
This guide covers the step-by-step cleaning process for all major brush types, with material-specific instructions, recommended cleaning frequencies, and practical maintenance considerations.
1. Why Cleaning a Hair Brush Matters
Hair brushes accumulate residue from multiple sources during normal use. Understanding what builds up — and why it matters — provides context for the cleaning methods that follow.
- Shed hair: The average person sheds 50–100 hairs per day, according to the American Academy of Dermatology. A significant proportion of this hair collects at the base of the brush bristles.
- Sebum and scalp oils: Natural oils from the scalp transfer onto bristles with every stroke. Over time, this creates a sticky film that traps dust and other particles.
- Product residue: Leave-in conditioners, hairsprays, gels, and dry shampoo accumulate on bristle surfaces, reducing the brush's ability to glide through hair.
- Dead skin cells and dust: Microscopic skin flakes and environmental particles settle between bristles, particularly in cushion-base and densely packed designs.
A dirty brush does not simply become less effective — it actively works against hair hygiene by transferring old residue back onto freshly washed hair. For brushes used in professional salon environments, regular cleaning is also a hygiene compliance requirement.
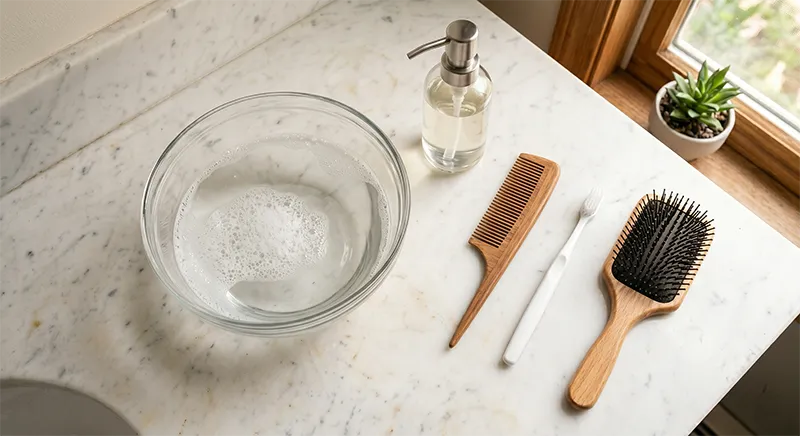
2. What Is Needed to Clean a Hair Brush
The cleaning process requires a small number of common household items. No specialised products are necessary for standard maintenance.
- A rat-tail comb, brush cleaning tool, or any pointed object (pen, pencil) for removing trapped hair
- Small scissors for cutting stubborn hair tangles
- A bowl or sink filled with warm water
- Mild shampoo, liquid soap, or clarifying shampoo
- Baking soda (optional, for heavy buildup)
- A clean toothbrush for scrubbing between bristles
- A clean towel for drying
3. Step-by-Step: How to Clean a Hair Brush
The following five-step process applies to most brush types. Material-specific variations are covered in the next section.
Step 1: Remove All Trapped Hair
Use the pointed end of a rat-tail comb to work between the bristle rows, starting at the edges and moving inward. Lift the accumulated hair upward and pull it free. For tightly packed bristles, use small scissors to cut through matted hair at the base before pulling it out. This step should ideally be performed after every use to prevent excessive buildup.
Step 2: Prepare the Cleaning Solution
Fill a bowl or clean sink with warm water. Add a few drops of mild shampoo or liquid soap and mix until a light lather forms. For brushes with heavy product buildup, adding one teaspoon of baking soda to the solution improves cleaning effectiveness. A solution of equal parts water and white vinegar can also be used as a natural disinfectant.

Step 3: Soak or Dip the Brush
For plastic and metal brushes, submerge the entire brush in the cleaning solution and soak for 5–10 minutes. For brushes with cushion padding, wooden handles, or natural bristles, dip only the bristle portion into the water — keeping the base and handle dry to prevent moisture damage.
Step 4: Scrub the Bristles and Base
Using a clean toothbrush, scrub between the bristles from the base upward. Pay particular attention to the area where bristles meet the brush head, as this is where product residue and dead skin cells concentrate. Work methodically across the entire brush surface.
Step 5: Rinse and Dry
Rinse the brush under cool running water until all soap residue is removed. Shake off excess water and place the brush bristle-side down on a clean, dry towel. Allow it to air dry completely before the next use — this typically takes several hours depending on brush type and ambient humidity.
4. Cleaning Methods by Brush Type
While the core process remains consistent, certain brush types require adjusted techniques to avoid material damage. The following table summarises the key differences.
| Brush Type | Soaking Method | Key Precaution | Drying Method |
|---|---|---|---|
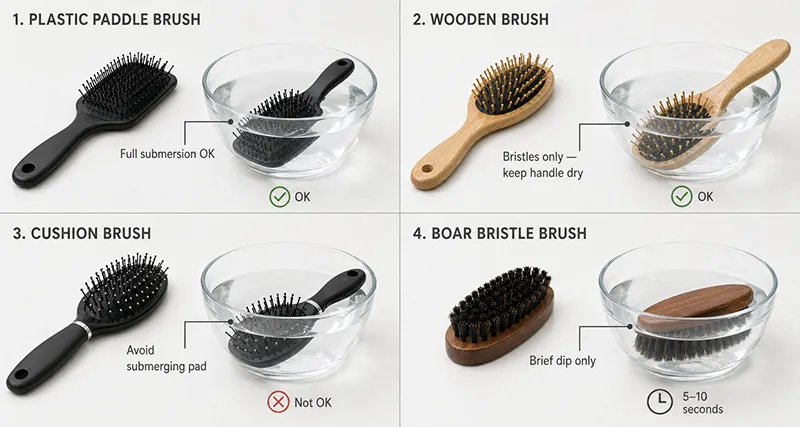
| Plastic paddle / vented brush | Full submersion, 5–10 min | None — most durable type to clean | Bristle-side down on towel |
| Cushion brush | Dip bristles only, avoid submerging the cushion pad | Water trapped under the pad can cause mould or degrade adhesive | Bristle-side down; in humid climates, use a hair dryer on low heat |
| Wooden handle brush | Dip bristles only, keep handle above waterline | Prolonged water exposure causes wood to swell and crack | Wipe handle immediately; air dry bristle-side down |
| Boar bristle brush | Brief dip only (30–60 sec), lukewarm water | Boar bristles are porous — extended soaking weakens and warps them | Pat with towel, air dry completely before use |
| Round / thermal brush | Dip bristles, avoid submerging barrel mechanism | Ceramic or metal barrels can trap water internally | Shake excess water; bristle-side down on towel |
| Detangling brush | Full submersion, 5–10 min | Flexible bristles are resilient to soaking | Bristle-side down on towel |
Special Considerations for Boar Bristle Brushes
Boar bristle brushes require the most careful handling during cleaning. The natural bristles contain keratin — the same protein found in human hair — which makes them porous and susceptible to water damage. A brief dip in lukewarm soapy water followed by gentle toothbrush scrubbing is sufficient. Hot water, harsh detergents, and prolonged soaking should be avoided entirely. After cleaning, boar bristle brushes may emit a mild odour while wet; this is normal and dissipates fully once the brush is dry. For a detailed overview of boar bristle brush properties and suitability by hair type, see the dedicated guide on boar bristle hair brushes.
5. How Often to Clean a Hair Brush
Cleaning frequency depends on usage patterns, hair type, and the amount of styling product applied. The following guidelines serve as a practical reference.
- After every use: Remove trapped hair from the bristles. This single habit significantly reduces the need for deep cleaning.
- Every 1–2 weeks: Perform a full deep clean (the five-step process above) for brushes used daily, particularly by individuals who use leave-in products, dry shampoo, or hairspray.
- Once a month: Sufficient for brushes used less frequently or by individuals who use minimal styling products.
- After illness or scalp conditions: Disinfect the brush with rubbing alcohol or a water-vinegar solution in addition to the standard cleaning process.
Brushes used in professional salon environments should follow stricter sanitation schedules in accordance with local hygiene and personal care standards, which typically require cleaning between clients.
6. Long-Term Maintenance and Replacement
Regular cleaning extends the functional lifespan of a hair brush, but all brushes eventually require replacement. Recognising the signs of wear helps maintain consistent performance.
- Bent or missing bristles: Bristles that no longer return to their original position after cleaning indicate structural fatigue. This reduces detangling effectiveness and may cause hair snagging.
- Cushion pad degradation: If the rubber cushion on a cushion brush loses its flex, develops cracks, or shows signs of mould around the air vent hole, the brush should be replaced.
- Persistent odour after cleaning: A brush that retains an unpleasant smell even after thorough cleaning may harbour bacteria deep within the cushion or bristle base.
- Handle damage: Cracked or splintering wooden handles and loosened plastic joints compromise grip and control during use.
For most consumer-grade brushes, replacement every 6–12 months is typical with daily use. Premium boar bristle brushes, when properly maintained, can last 3–10 years depending on construction quality and care routine. Brands offering OEM hair brush sampling and prototyping services often include cleaning and maintenance instruction cards with retail packaging — a detail that supports customer retention and reduces return rates.

7. Conclusion
Cleaning a hair brush is a straightforward maintenance task that directly affects both brush performance and hair hygiene. The process — removing trapped hair, soaking in a mild shampoo solution, scrubbing the bristles and base, rinsing, and drying bristle-side down — takes approximately ten minutes and requires no specialised tools.
The key variable is material sensitivity. Plastic and nylon brushes tolerate full submersion, while wooden handles, cushion pads, and boar bristles require restricted water contact to prevent damage. Matching the cleaning method to the brush construction ensures effective sanitation without shortening the product's lifespan.
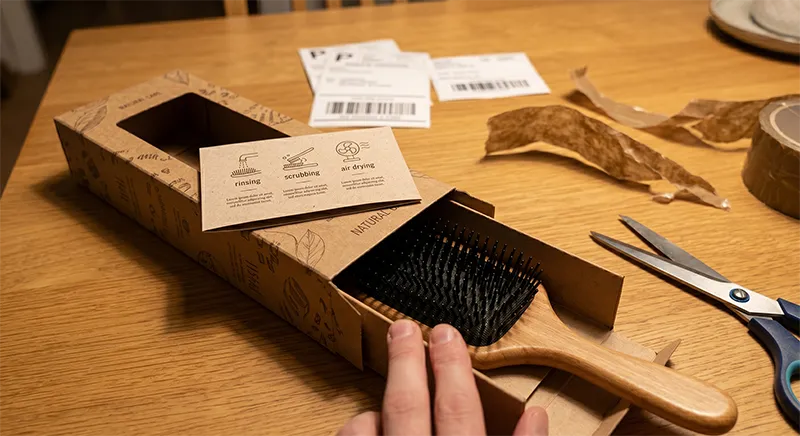
For brands building hair brush product lines, including a care instruction card inside retail packaging is a low-cost addition that meaningfully improves end-user experience. Manufacturers such as JunYi Beauty, which produces across the full range of brush types — from injection-moulded paddle brushes to hand-set boar bristle models — at its Dongguan production facility, can integrate printed care guides as part of the OEM packaging specification. For a comprehensive overview of brush categories and their construction, see the full guide on types of hair brushes.